Not-quite-no-knead bread
By Jessica – October 17th, 2010
In 2006, Mark Bittman published a recipe in the New York Times for no-knead bread which took the breadmaking blogosphere by storm. It calls for mixing together—but not kneading—a very wet dough and letting it stand overnight before baking it inside a covered pot. The result is an artisan-quality bread with a crispy outside, chewy inside and slight sourdough tang.
 I’ve made this bread several times, and there’s no doubt that you get a great texture without the hassle of kneading. But most of the bread I make winds up as breakfast toast, and I don’t always want a sour bread with my jam first thing in the morning. And what’s more, I’m not always foresighted enough to start making bread the day before I want to eat it.
In light of this, I assumed my breadmaking options were limited to either traditional recipes which call for a strenuous knead to develop a good chewy texture, or fast no-knead recipes (like the one I discussed on this site several years ago) which result in a bread which is tasty but also heavy and crumbly.
As it turns out, there is another way: a not-quite-no-knead bread which gives you all the luscious chew of the slow-rise bread, but without the slow rise (and the yeasty sourness that comes with it). This interesting method comes from Dan Lepard by way of Felicity Cloake, and it entails neither kneading for a long time nor not kneading at all (say that fast 5 times), but rather kneading for just a few seconds at three 10-minute intervals before letting the dough rise for an hour. Surprisingly, this gives you a great crumb without all the elbow grease.
 As for the kneading itself, I’ve been a fan of the Richard Bertinet technique ever since receiving a copy of his beautiful book Crust for my birthday last year. Instead of pushing and pulling the dough this way and that, Bertinet kind of slaps it around on the counter; it’s easier to watch him doing it than to describe it, so check out this video on the Gourmet website (he starts kneading about a minute in). This is a great way of working with dough which is too soft to knead—in other words, just the kind of dough you want for really tender, crusty bread.
Now, there’s no denying it: even with the slap method, handling wet, sticky dough is a messy undertaking for the novice baker and one of which, honestly, I’m none too fond (I have a compulsive distaste for foodstuffs clinging to my fingers—just ask my parents about my childhood taco-eating issues).
But the bread I’ve made using super-soft dough has turned out so consistently excellent that I’m willing to put up with a few globs of dough sticking to me in the process. And I’ll let you in on a secret: when I made my most recent loaf, I didn’t even take the dough out of the bowl for its short kneading sequences, I just folded it over on itself several times in the bowl using my dough scraper, and I can’t say I noticed a difference in the final product.
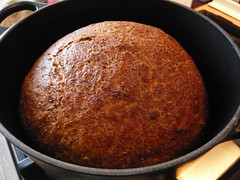
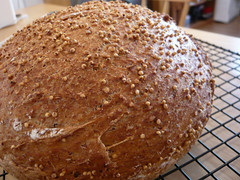
What really does seem to make a difference is the method of baking. This is where I come full circle and return to the original no-knead recipe and its covered pot. Professional bakers often use steam-injected ovens which, for science-y reasons, lead to a well-risen loaf and a great crust. It’s almost impossible to recreate such steamy conditions in your average home oven, but by baking your dough in a sealed pot (cast iron, enamel, ceramic), you trap the steam which would otherwise evaporate—and you end up with a perfectly round, perfectly browned bread. Perfect!
For one lovely loaf, you’ll need:
- 2 cups wholemeal flour and 1 cup plain white flour (450g/1lb total)*
- 2 teaspoons fast-acting/instant yeast
- 2 teaspoons salt
- 1 tablespoon honey
- about 400ml/1.5 cups warm water
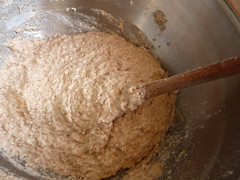 Combine the flour, yeast and salt in a large bowl. Dissolve the honey in the warm water and pour the liquid into the dry ingredients. Stir everything together well, then cover the bowl and let the dough sit for 10 minutes (this will give the flour some time to absorb the water).
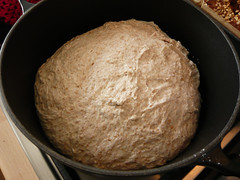
Uncover the dough and either tip it onto a lightly floured surface to slap/knead it for about 10 seconds, or knead it in the bowl for the same amount of time. Then let the dough sit in the covered bowl for another 10 minutes, knead again for 10 seconds, cover again for 10 minutes, and knead a final time for 10 seconds before letting the dough rest for 15 minutes, covered. Finally, shape your dough into a ball as best you can on a lightly floured surface, then plop it into a clean, oiled bowl, cover it and let it sit in a warm place for about an hour.**
When the dough has risen, put your covered pot*** in the oven and preheat the oven to 220C/425F. In the meantime, punch down your dough, shape it into a ball as much as you can and return it to the bowl, covered. Let it sit there while the oven heats for about half an hour, then take the pot out of the oven, dump your dough into it (it doesn’t matter if it’s a bit messy), cover the pot and get it back into the oven.
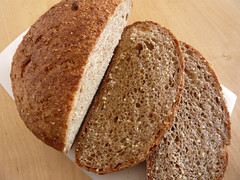
 Bake the bread in the covered pot for 30 minutes, then remove the cover and bake for another 20 minutes or so, until the loaf is well browned and sounds hollow when you tap on it (you can also stick an instant-read thermometer into the bread to make sure it’s reached about 95C/200F in the middle). Take the bread out of the pot and let it cool completely on a wire rack. Don’t cut into it until it’s properly cooled or else you’ll get a gummy crumb—and nobody wants a gummy crumb.
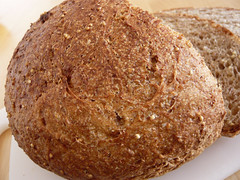
Then take a good bread knife, crunch through that delectable crust to the springy, chewy bread inside, and enjoy your amazing homemade bread for days to come.
Notes:
*You can adjust the proportion of wholemeal and white flour as you like, but I’ve found this ratio to be reliable for a brown bread that isn’t like a brick. You can also add grains or seeds during the kneading stage for extra crunch in the finished product (I’ve used millet in some of the loaves you see here, which adds a great texture).
**If you really prefer 10 minutes of solid kneading to half an hour of intermittent dough slapping, then by all means give the dough a single good knead before letting it rise—the Bread Police won’t come after you. The same applies to adding more flour if your dough is really really too wet to handle; it’s best if you don’t keep throwing more flour into the mix, but sometimes these things just have to be done.
***I use a 20 cm cast iron enameled Le Creuset casserole which works great even though it’s about half the size of the pot suggested in the original no-knead bread recipe. Whatever pot you use, make sure all parts of it (handles included) can withstand high temperatures.
Comments
Hi, My oven went out not long ago, and I’ve been baking food in my toaster oven, like pies, biscuits etc. I was wondering is there any way I can bake home made bread in my toaster oven while my oven is being fix……Thank You
Whenever I make dough with yeast it never rises, it just stays flat. What am I doing wrong?
Made this today. It was wonderful, thank you very much.
Jono
Hi Bonita, I don’t think a toaster oven can get hot enough to bake bread at an ideal temperature, though you could give it a try; I would definitely take the internal temperature of the bread to make sure it’s baked through, though.
Hi Idah, unfortunately there are any number of possible reasons for your dough not to rise. Make sure that your yeast is fresh, and give the dough enough time to rise in a covered bowl in a warm place—but don’t let it rise too much (or "over-proof") or else it will collapse.
Hi Jono, I’m glad your bread turned out good!
Idah,
Another reason that your bread may be flat is that your warm water is perhaps too warm. Yeast will die if the water is too warm. Try lukewarm/body-temperature water and see if that makes a difference!
I made the loaf this morning and have just had a very tasty slice of it for lunch. I was a little unsure about knocking it back just 30 minutes before baking, so gave it about 40-45 minutes and ended up with a good loaf that sprang nicely in the oven. I threw in my favourite selection of accompaniments: linseeds, sesame seeds, toasted sunflower and pumpkin seeds, and a small pinch of whole fennel seeds. The fennel is powerful so you have to go easy on it, but it’s wonderful in a loaf. Obligatory photo here: http://www.flickr.com/photos/fstorr/5172374093/in/set-72157623532559795/
I found you through a google search for the "30 minute knead" method —- I have a standard "sandwich bread" type recipe that I use with the every 10 minute knead method and was looking to expand my repertoire. I’ve been baking mine in a standard loaf pan and didn’t think of trying Lahey’s hot pot method for the bread, but will do that with the next loaf (this evening???) Although I’ve come a little late to the posting, thanks for the recipe … and the ideas … recipes are really just a jumping off place, aren’t they?
Also, could part of Idah’s problem not just be out-of-date yeast, but also using too hot of a water and killing the yeast before it gets a chance …
Sorry. Comments are closed.